Difference between revisions of "Lesson 6 - prime directive"
Bo3b admin (Talk | contribs) |
Bo3b admin (Talk | contribs) |
||
| Line 9: | Line 9: | ||
[http://youtu.be/gR2FKk1hz4c <u>Video Walkthrough on YouTube, pt 1</u>] ... | [http://youtu.be/gR2FKk1hz4c <u>Video Walkthrough on YouTube, pt 1</u>] ... | ||
[http://sg.bo3b.net/Lesson%205%20pt%201.mp4 <u>Video Walkthrough direct download link, pt 1</u>] | [http://sg.bo3b.net/Lesson%205%20pt%201.mp4 <u>Video Walkthrough direct download link, pt 1</u>] | ||
| − | |||
| − | |||
| − | |||
<br> | <br> | ||
<br> | <br> | ||
Revision as of 23:34, 20 September 2014
Summary
Now it's time to talk about how stereo 3D is created, and the math behind it.
Level of difficulty: Easy
Time required: 30 minutes
Video Walkthrough on YouTube, pt 1 ...
Video Walkthrough direct download link, pt 1
Objective
Review and understand the principles behind stereoscopy.
Learn about the prime directive formula, and how to apply it.
Quiz
Fix the water shader at the end of the game.
For effects that are important for game play, the best solution is of course to fix them, not disable them. We can fix a surprisingly large number of broken effects with different techniques that we will learn in future Lessons.
Let's start by fixing an easy one in The Ball, where there is already stereo fix code to guide us. This is the Lava effect. This will be our first actual fix, as opposed to disabling them.
As a general idea, we probably would not fix this effect, because the version with one layer disabled is perfectly acceptable. It's always worth keeping an eye on how much time a given effect is worth, because there are always more games.
We'll step back into The Ball for a minute to get a first glimpse of the 3D formula I'm calling the prime directive.
Let's not worry about the details yet, just see how it's applied.
- Fix Lava effect, not just disable it.
- Lava in The Ball is perfectly usable now, but we noticed the Unreal fix earlier.
- Unreal fix did not function, but we can make it work, using HelixMod inputs.
- Edit shader file to use HelixMod stereo texture, instead of game based one.
- Fixed in 3D, not just disabling a piece of it.
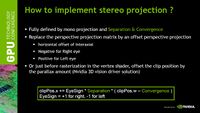
The best background for how 3D works is a presentation from NVidia for GTC2010.
http://www.nvidia.com/content/GTC-2010/pdfs/2010_GTC2010.pdf
It seems like everyone in this class is going to have a reasonably good idea for the basic principles of stereoscopy, so I'm not going to go into those basics. It would still be worth reading this paper for a refresher and to get the terminology that NVidia uses.
The prime directive from that slide:
clipPos.x += EyeSign * Separation * ( clipPos.w – Convergence )
- Experiment on lava shaders.
- Inspect and experiment on lava in PS.
- In pixel shader, try changing each texld to invisible.
- Those don't work, look next at the input section with interesting stereo fix.
- See that v1 is an input location.
- Experiment by changing v1 to null.
- Fix lava by killing one texture instead of the entire shader.
- optional: Fix the lava from the VertexShader output side, where v1 is created.
With that background, let's go back to the Lava, but fix it from the VertexShader this time.
The
- Fix Lava effect using the prime directive.
- Run TheBall, and load up a Lava level.
- Shader hunt for the VertexShader this time. Note the non-obvious shader makes it all dark.
- Exit out and move the found shader to ShaderOverride.
- Edit the shader
Quiz: Go to the end of the demo, and fix the broken water using the prime directive.
- Fix the water shader at the last level.
- Play through to the giant worm at the end, it's not far.
- See the water has double-imaging like the water in the hall earlier.
- Find the shader for the water effect.
- Disable it. Note that it's really not good enough disabled.
- Experiment with it to fix it to where it's acceptable.
- Save a screenshot to your personal page.
